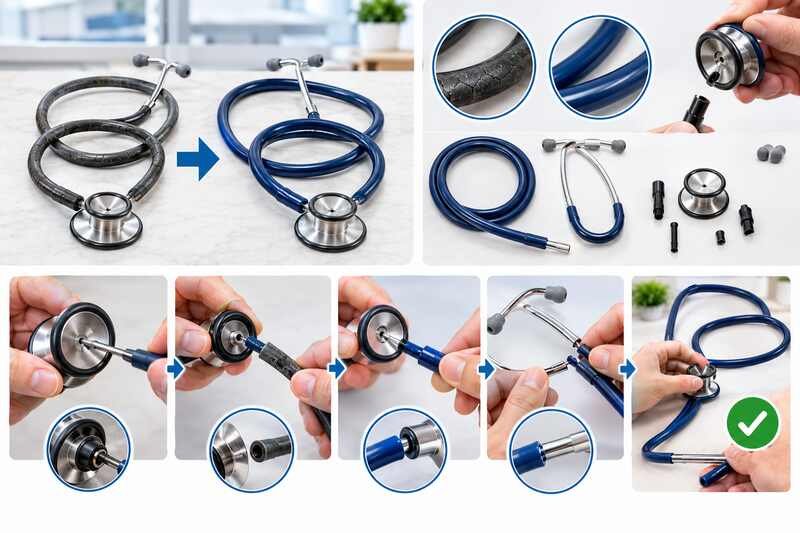
 Knowing how to replace stethoscope tubing is one of the most useful repair skills a clinician can pick up. The tubing is usually the part that wears out fastest on an otherwise healthy instrument. A stethoscope with a cracked or hardened tube can leak sound at the exact spot where a faint murmur or breath sound needs to travel cleanly from the chestpiece to your ears.
The good news is that replacing the tubing does not require sending the stethoscope back to the manufacturer. It also does not require buying a whole new unit. Most stethoscopes are built with the tubing as a separate, swappable component. A compatible replacement tube usually costs a fraction of what a new stethoscope costs.
This guide covers why tubing wears out and how to tell when it needs replacing. It also walks through the exact steps for swapping it yourself, plus what to do if a new stethoscope ends up making more sense instead. We will cover the parts of a stethoscope along the way too, since knowing what each piece does makes the replacement process easier to follow.
Key Takeaways
- Stethoscope tubing is usually made of PVC, which hardens and cracks over time from skin oils, alcohol sanitizer, and UV exposure
- A compatible replacement tube typically costs between $15 and $45, far less than a new stethoscope
- Most tubing swaps take less than 10 minutes and require no special tools
- Some manufacturers offer free replacement parts for life, but tubing is often not included in those programs
Description of the Parts of the Stethoscope
The parts of a cardiology stethoscope are designed for user comfort and patient comfort. They also need to efficiently transmit internal organ sounds from the lungs, heart, and abdomen. Understanding each part makes it much easier to know exactly what you are removing and replacing later in this guide.
Binaural tubes: These are the two rigid, movable metal tips that hold the tubing. They allow the stethoscope to be worn in both ears at once, and they are usually spring-tensioned so the eartips press evenly against the ear canal.
Eartips: The eartips sit at the top of the binaural tubes. They should be angled forward, toward the user’s nose, to match the natural angle of the ear canal and block outside noise.
Tubing: The tubing carries sound from the chestpiece up to the binaural tubes. It is almost always made of a flexible PVC or similar polymer, and it is the single part most likely to need replacement over the life of a stethoscope.
Chestpiece: This is the metal head that picks up sound from the patient’s body. Chestpieces can be single-sided or double-sided, and the side in use changes which sound frequencies come through most clearly.
Diaphragm: The diaphragm is the flat, rigid disc covering the chestpiece. It vibrates in response to sound and works best for higher-pitched tones like normal heart sounds and most breath sounds.
Non-chill ring: This is a thin rim around the chestpiece. It keeps cold metal from touching the patient’s skin directly, which improves comfort during an exam.
Stethoscopes typically come with either a 21-inch single-lumen tube or dual-lumen tubing that separates the two sound channels along the same length. Overall stethoscope length usually falls between 27 and 29 inches. Most models weigh between 5 and 7 ounces.
Why Stethoscope Tubing Wears Out
Tubing failure is almost always a material issue rather than a manufacturing defect. According to Ultrascope’s guide to stethoscope tubing care, the PVC used in most stethoscope tubing reacts to skin oils. Those oils build up when the tube rests against bare skin or is worn around the neck for long shifts, and over time they draw moisture out of the material, making it stiffer and more prone to cracking.
Alcohol-based hand sanitizer is another major cause. Repeated wiping with alcohol seeps into microscopic cracks in the PVC and breaks the material down from the inside. That is part of why a stethoscope sanitized constantly in a busy hospital often needs new tubing sooner than one used occasionally in a private practice.
Direct sunlight is a third factor. UV exposure makes tubing look chalky, changes its color, and leaves it brittle enough to crack from ordinary handling. Extreme heat, whether from a hot car dashboard or a sterilizing tray, can also soften or harden PVC tubing unevenly. That unevenness is another reason manufacturers advise against leaving a stethoscope in direct sun or high heat for extended periods.
Signs Your Stethoscope Tubing Needs Replacing
A few warning signs typically show up before a tube fails completely. Visible cracks anywhere along the tubing are the clearest sign, even if they look small at first. A crack anywhere along that path lets sound escape before it reaches your ears. Stiffness is another giveaway. Tubing that used to flex easily but now feels rigid or brittle has likely lost the oils that kept the PVC pliable.
A noticeable drop in sound quality is worth paying attention to as well. Fainter heart or lung sounds that used to come through clearly often mean air is leaking somewhere along the tube, rather than pointing to a hearing problem on your end. Discoloration and a chalky surface texture are two more signs worth watching for. A tube that has visibly stretched or thinned in spots has already started to break down. Once you notice two or more of these signs together, it is usually time to look into how to replace stethoscope tubing rather than waiting for it to fail during an actual exam.
How to Replace Stethoscope Tubing Step by Step
Once you have confirmed the tubing needs replacing, the process itself is fairly quick. Here is exactly how to replace stethoscope tubing from start to finish.
Step 1: Buy Compatible Replacement Tubing
Tubing is not universal across brands, so check your stethoscope’s model before ordering. Most manufacturers sell tubing sized specifically for their own chestpiece and binaural connectors. A tube built for a different brand often will not seal properly, even if it looks similar at a glance. Expect to pay far less than the cost of a new stethoscope, and confirm the listed length matches your current tubing if you want the fit to stay the same.
Step 2: Remove the Old Tubing
Gently twist and pull the old tubing off the binaural tubes and off the chestpiece stem. This usually works fine on tubing that is still reasonably flexible. If the tubing has hardened, twisting alone may not be enough. In that case, carefully cut the old tubing away in small sections rather than forcing it. Wipe any remaining residue from the connectors with a cloth lightly dampened with rubbing alcohol.
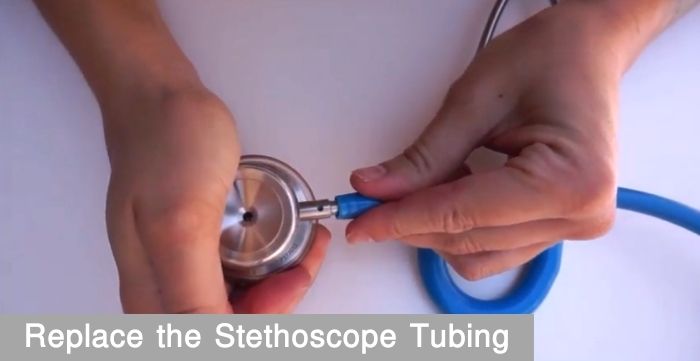
Step 3: Install the New Tubing
Slide the new tubing onto the chestpiece stem first, twisting gently as you push it into place until it is fully seated. Repeat the same twisting motion to attach the other end to the binaural tubes. If the diaphragm side is reversible, double-check that both connection points are seated all the way. A loose connection is one of the most common reasons a freshly replaced tube still sounds muffled.
Step 4: Test Your Stethoscope
Before using the stethoscope on a patient, tap gently on the diaphragm and listen for a clear, consistent sound through both eartips. Flex the new tubing along its length while listening for any change in volume, since that would indicate a connection that is not fully seated. A properly installed tube should sound just as clear as the day the stethoscope was new.
Where to Buy Replacement Tubing and What It Costs

Pricing varies by brand and tubing type. A Littmann Classic Series replacement tube, compatible with the Classic and Classic II S.E. models, currently retails for $45.00 on Stethoscope.com, down from a list price of $53.99. Tubing for other brands, including many budget and mid-range models, typically runs between $15 and $30. The process for how to replace stethoscope tubing stays the same across brands once the correct part arrives.
Check your manufacturer’s parts policy before buying, since not every part is covered the same way. MDF Instruments, for example, offers a free-parts-for-life program covering eartips, diaphragms, retaining rings, and non-chill rings. Tubing is notably not included, so it still needs to be purchased separately. If you are weighing whether to replace the tubing at all or put that money toward a new stethoscope instead, our guide on how much a stethoscope costs breaks down current pricing across budget, mid-range, and cardiology-grade models.
How to Select the Right Stethoscope
Sometimes a worn-out tube is really a sign that the whole stethoscope has reached the end of its useful life. This is especially true if the diaphragm, eartips, and hinges are also showing wear. If you are shopping for a replacement instead of a new tube, a few factors matter most.
Price: Most working clinicians do fine with a mid-range acoustic stethoscope. Cardiology-focused models cost more, but they offer better acoustic sensitivity. Our overview of what a stethoscope does and how it works covers how that added sensitivity actually functions.
Standard versus electronic: Standard acoustic stethoscopes work well across most day-to-day use. Electronic models amplify sound and can filter background noise, which matters more in loud environments like a busy emergency department.
Fit: A stethoscope that does not fit well is uncomfortable and less effective. A poor seal at the ear lets outside noise back in. Our guide to how to properly use a stethoscope covers ear tip fitting in more detail.
Frequency range: Clinicians who work in cardiology or pulmonology benefit from a wider frequency range. That range determines how many distinct tones the chestpiece can pick up. Clinicians who also track patients between visits often pair a stethoscope with a dedicated heart rate monitor for ongoing readings outside the exam room.
Tube design: A dual-lumen tube keeps the two ear channels separate along its full length. Some users find this delivers slightly clearer stereo separation than a single-lumen design, though the difference is subtle enough that personal preference plays a large role.
Caring for Your Tubing to Make It Last Longer
A few habits go a long way toward avoiding another round of tubing replacement sooner than necessary. Wipe the tubing down rather than soaking it, since prolonged contact with alcohol-based disinfectant is one of the fastest ways to break down PVC. Store the stethoscope loosely coiled instead of tightly wound or kinked. Sharp bends held over time create weak points where cracks tend to start.
Keep the stethoscope out of direct sunlight and out of hot cars. Both accelerate the same UV and heat damage that causes tubing to harden in the first place. Finally, avoid wearing it draped directly against bare neck skin for an entire shift when possible. The same skin oils that keep your hands soft are exactly what makes PVC tubing brittle over time. A little care here goes a long way toward delaying the next time you have to think about how to replace stethoscope tubing at all.
Frequently Asked Questions
Q: How often should stethoscope tubing be replaced?
There is no fixed schedule. Tubing used daily in a busy hospital and sanitized frequently may need replacing within a year or two. A stethoscope used occasionally and cared for properly can go much longer before the tube shows any wear.
Q: Can any tubing fit any stethoscope?
No. Tubing is sized and shaped to match a specific brand’s connectors. It is important to buy tubing made for your exact stethoscope model rather than a generic tube that only looks similar.
Q: Is it cheaper to replace the tubing or buy a new stethoscope?
Replacing the tubing is almost always cheaper, often costing a small fraction of a new stethoscope’s price. It only makes sense to buy new if other parts, like the diaphragm or hinges, are also failing.
Q: What is the most important step in how to replace stethoscope tubing correctly?
Making sure both ends are fully seated matters most. A tube that looks attached but is not pushed on all the way is the most common reason a freshly replaced tube still sounds muffled or quiet.
Q: Do I need any special tools to replace stethoscope tubing?
No special tools are required for most models. A pair of scissors for cutting away old, hardened tubing and a cloth with a little rubbing alcohol for cleaning the connectors is usually all you need.
Conclusion
Learning how to replace stethoscope tubing is a small skill that saves real money over the life of an instrument. Most tubing failures come down to ordinary wear from skin oils, alcohol sanitizer, sunlight, and heat rather than a defect. A compatible replacement tube is inexpensive and quick to install with no special tools required. Paying attention to the early warning signs, cracking, stiffness, or a drop in sound clarity, means you can replace the tube before it fails during an exam rather than after. When the rest of the stethoscope is still in good shape, a new tube is almost always the more practical choice over buying an entirely new instrument.

Hi, I’m Mamon, the content creator behind this blog. I share my experience in blogging, WordPress, SEO, and affiliate marketing through honest product reviews, in-depth buying guides, and practical how-to articles. Every piece of content is thoroughly researched and written to help readers make informed decisions.
Leave a Reply