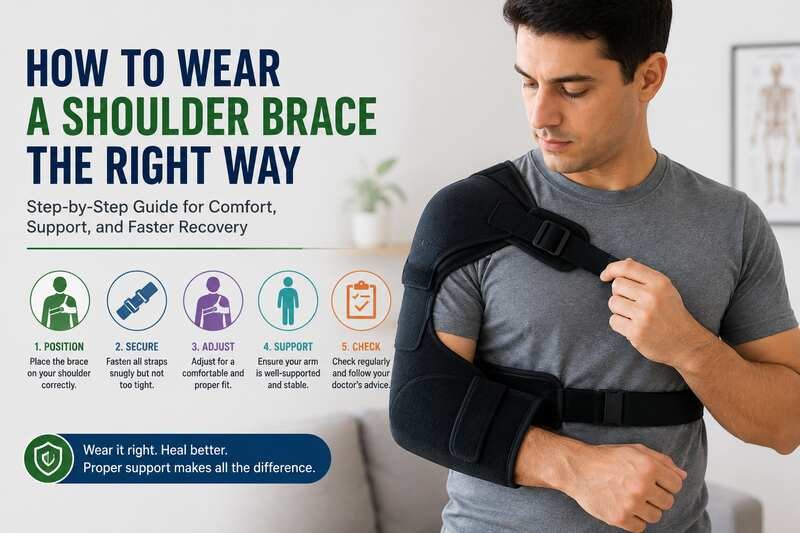
Learning how to wear a shoulder brace correctly makes a real difference in your recovery. A shoulder brace supports the joint, limits painful movement, and protects healing tissue after an injury or surgery. U.S. orthopedic clinics fit thousands of patients with these devices every year, yet many people still wear the straps too loose, too tight, or in the wrong position. This guide walks you through the fitting steps, shows you what a properly worn brace should feel like, and covers the mistakes that slow recovery down.
Key Takeaways
- The thick pad of the brace should sit directly over the top of your shoulder, not off to the side.
- Straps should feel snug but should never cut off circulation or pinch the skin.
- Most people wear a shoulder brace for one to six weeks, depending on the injury.
- Take the brace off for showering, and check your skin daily for red marks or irritation.
- Always follow your doctor’s specific instructions on wear time and activity limits.
What Is a Shoulder Brace and Who Needs One?
A shoulder brace, also called a shoulder immobilizer or sling, holds your arm close to your body and limits how far the joint can move. Doctors prescribe them after a dislocated shoulder, a rotator cuff tear, a fracture near the joint, or shoulder surgery. The brace does not fix the injury on its own. It simply protects the area while soft tissue and bone repair themselves.
Two main styles exist. A basic sling supports the forearm and takes weight off the shoulder. A full immobilizer adds a wide strap across the chest and locks the upper arm against your torso, which limits rotation almost completely. Your doctor picks the style based on your specific diagnosis, so check with them before buying a shoulder compression brace on your own.
Shoulder Brace vs. Sling vs. Immobilizer: Which One Do You Need?
People often use these three terms interchangeably, but the devices differ in how much movement they restrict. A basic arm sling holds your forearm and takes pressure off the shoulder joint, yet it still allows some rotation at the shoulder itself. A shoulder immobilizer adds a wide chest strap that locks the upper arm firmly against your torso, which blocks nearly all rotation and abduction. A shoulder brace is a broader term that can describe either device, along with compression-style wraps that support the joint without fully restricting motion.
Your diagnosis determines which type you actually need. A minor strain or mild instability may only call for a compression brace that offers support during daily tasks. A dislocation, a fracture near the joint, or a surgical repair almost always calls for a full immobilizer during the early weeks of healing. Ask your doctor which category your injury falls into before you decide how to wear a shoulder brace day-to-day. Wearing the wrong style can either under-protect the joint or restrict movement more than necessary.
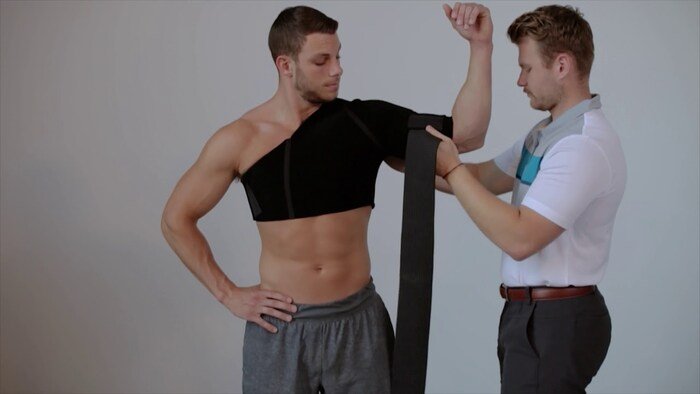
How to Wear a Shoulder Brace: Step-by-Step
Once your doctor recommends a brace, knowing how to wear a shoulder brace properly protects your shoulder from further strain. Follow these five steps every time you put the brace on.
Step 1: Inspect the Brace First
Lay the brace flat and look at its parts. Most designs include a strap that crosses your shoulder like a car seatbelt and a second strap that cradles your forearm. Check both for tears, worn Velcro, or a broken buckle before you put it on. A damaged strap will not hold its adjustment and can slip during the day.
Step 2: Prepare the Straps
Unfold the brace completely and loosen every strap before you put your arm through it. Tight, unadjusted straps make the next steps much harder and can twist the padding out of place. Open any zippers or clasps so the brace slides on smoothly.
Step 3: Slide Your Arm Through
Guide your injured arm through the sling from the side that needs support. Pull the fabric up until the thick pad rests directly over your shoulder. That pad protects the joint, so it must sit centered rather than sliding toward your neck or your upper arm.
Step 4: Secure the Shoulder Strap
Pull the main strap across your back and connect it at the front of your chest. You should hear a clicking sound as the buckle locks. Tighten it until the brace feels snug against your body. Overtightening the strap puts extra pressure on the joint and causes more pain, so stop as soon as the brace feels secure but comfortable.
Step 5: Adjust the Arm Support
Use your free hand to tighten the strap that holds your forearm. Ask a family member for help if you cannot reach it comfortably. Your wrist should sit slightly higher than your elbow, which keeps fluid from pooling in your hand during the day.
How to Put On a Shoulder Brace While Standing or Seated
Physical therapists teach two common methods for fitting a sling: one for standing patients and one for patients who need to sit. Watch this short demonstration from the Mayo Clinic to see both techniques performed correctly, since seeing the motion helps far more than reading about it.
Notice how the therapist keeps the elbow bent at roughly ninety degrees throughout the fitting. That angle takes the most pressure off the rotator cuff and the surrounding muscles. If your brace forces your elbow into a much sharper or wider angle, ask your provider to help you adjust the fit.
Tips for Wearing a Shoulder Brace Comfortably
Getting the fit right on day one is only part of the process. Learning how to wear a shoulder brace correctly also means adjusting your daily habits so the device keeps working the way it should. These tips help you wear the brace correctly for the full length of your recovery.
Get the Right Size and Material
A brace that is too small digs into your armpit and neck. A brace that is too large lets your shoulder shift out of position. Always follow the manufacturer’s sizing chart and your doctor’s specific recommendation. Neoprene braces resist sweat and odor, cotton options feel softer against sensitive skin, and rigid plastic frames cost less but offer less breathability. Pair your brace with supportive compression sleeves if your doctor also wants extra support on the elbow or forearm.
Don’t Wear It for Every Activity
Take the brace off before you shower, since trapped moisture leads to bacteria and a lingering odor inside the padding. Skip the brace during contact sports or heavy lifting unless your doctor specifically approves those activities while wearing it. According to the American Academy of Orthopaedic Surgeons, returning to sports too early after a shoulder injury raises the risk of a repeat dislocation. Patience during this stage really does pay off.
Check Your Skin Every Day
Look for red marks, blisters, or numbness anywhere the straps touch your skin. Loosen any strap that leaves a deep indentation. Report ongoing numbness or tingling in your hand to your doctor right away, since it may mean a strap sits too tight against a nerve.
Common Mistakes to Avoid
Even people who understand how to wear a shoulder brace correctly still make a few avoidable mistakes during recovery.
- Wearing the brace loosely to feel more comfortable. A loose brace fails to limit motion, which defeats its whole purpose.
- Sleeping without any support. Many doctors recommend keeping a lighter version of the brace on overnight so you do not roll onto the injured shoulder.
- Skipping the prescribed exercises. A brace protects the joint, but gentle, doctor-approved movement prevents stiffness once healing allows it.
- Removing the brace early because the pain has faded. Reduced pain does not always mean the tissue has finished healing.
- Ignoring posture. Slouching forward while wearing the brace adds strain to your neck and upper back, so sit and stand as upright as your comfort allows.
Some recoveries involve a broader mobility setback beyond the shoulder itself. In that case, a guide like our fitness program for recovering from a slip and fall injury can help you rebuild strength safely once your doctor clears you for light activity.
How Long Should You Wear a Shoulder Brace?
Wear time depends entirely on your specific injury. A mild strain may only need a brace for one to two weeks. A dislocation or a surgical repair often calls for four to six weeks of near-constant wear, followed by a lighter support during physical therapy. The Mayo Clinic notes that recovery timelines vary widely based on age, activity level, and whether the shoulder has dislocated before. Never stop wearing the brace early just because your schedule allows it. Follow your provider’s timeline instead, and mention any setback in your recovery immediately.
Other joint injuries follow a similar pattern. If you have also dealt with a wrist sprain, our guide on how long to wear a wrist brace for a sprain breaks down comparable healing timelines.
Caring for Your Shoulder Brace
Hand-wash the padding and straps with mild soap and cool water, then air-dry the brace completely before wearing it again. Avoid the washing machine and dryer, since heat can warp the foam padding and weaken the elastic. Inspect the Velcro regularly, because worn Velcro loses its grip and allows the straps to loosen throughout the day. A well-maintained brace holds its shape and support for the entire length of your treatment.
When to See a Doctor
Contact your doctor if you notice increasing pain, new numbness, swelling that does not improve, or a fever near the injury site. These signs can point to a complication that needs prompt attention rather than home management. A shoulder brace is sometimes just one part of a larger recovery plan after an accident. A broader resource such as our back brace comparison guide can help you address related support needs as you heal.
Frequently Asked Questions
How tight should a shoulder brace be?
The brace should feel snug enough to limit movement without cutting off circulation. You should be able to slide one finger under any strap comfortably.
Can I sleep in my shoulder brace?
Many doctors recommend wearing a lighter version overnight during the first few weeks to prevent you from rolling onto the injured shoulder while asleep.
Is it normal for my hand to swell while wearing the brace?
Mild swelling can happen because your arm stays below heart level for long periods. Elevate your hand on a pillow when resting, and call your doctor if the swelling does not improve.
How do I know if I’m wearing a shoulder brace correctly?
A correctly worn shoulder brace keeps the thick pad centered over your joint, holds your elbow near a ninety-degree angle, and stays snug without pinching your skin.
Can I shower with a shoulder brace on?
No. Remove the brace before showering and keep it dry, since trapped moisture damages the padding and creates a breeding ground for bacteria.
What happens if I wear the brace incorrectly?
An incorrectly worn brace can shift the joint out of its protected position or add pressure to nerves. It may also fail to limit the motion your doctor wants restricted, which can slow your recovery.
Do I need a doctor’s prescription for a shoulder brace?
Mild cases sometimes use an over-the-counter sling, but a proper diagnosis helps you choose the right style and confirms the brace matches your specific injury.
What is the best way to learn how to wear a shoulder brace at home?
Watch a demonstration video from a trusted medical source, then practice the fitting steps in front of a mirror. If anything feels unclear after a few attempts, ask your physical therapist or doctor to walk through the process with you in person during your next visit.
Bottom Line
Knowing how to wear a shoulder brace properly speeds up recovery and lowers your risk of re-injury. Center the padding over your joint, keep the straps snug rather than tight, and follow your doctor’s timeline for how long to wear it each day. Combine the brace with any recommended exercises, watch your skin for irritation, and reach out to your provider whenever something feels off. These small habits protect your shoulder while it heals and help you return to your normal activities with confidence.

Hi, I’m Mamon, the content creator behind this blog. I share my experience in blogging, WordPress, SEO, and affiliate marketing through honest product reviews, in-depth buying guides, and practical how-to articles. Every piece of content is thoroughly researched and written to help readers make informed decisions.
Leave a Reply