

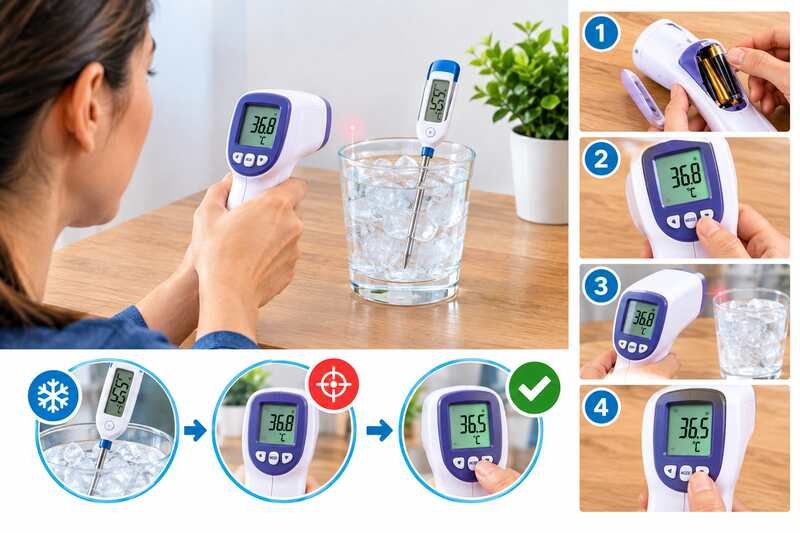

Infrared thermometers are key in many fields, but they can lose accuracy over time. That’s why knowing how to calibrate an infrared thermometer is essential for maintaining precise temperature readings. Whether for work or personal use, learning how to calibrate an infrared thermometer ensures it provides reliable results. Factors like room temperature, dirt on the lens, and wear on parts can affect its accuracy, making regular calibration crucial for accurate measurements.
Experts in various fields know that calibrating infrared thermometers needs careful attention. They focus on the environment and specific ways to check the device. Understanding the technology and using systematic checks are key steps to getting this right the first time.
Key Takeaways
- Calibration is essential for maintaining measurement accuracy
- External factors can significantly impact infrared thermometer performance
- Regular maintenance extends device lifespan
- Different industries require specific calibration standards
- Controlled environments are critical for accurate calibration
Understanding Infrared Thermometer Technology and Its Applications
Infrared thermometers are a big step forward in measuring temperature without touching things. They let you check the temperature of objects from a distance. This way, you get accurate readings without having to touch the object.

IR temperature measurement uses a cool science fact: every object gives off infrared radiation based on its temperature. These devices pick up this invisible heat and turn it into exact temperature numbers, which is also why knowing how to calibrate an infrared thermometer against a known reference matters so much.
How Infrared Temperature Measurement Works
An infrared thermometer works by catching the electromagnetic radiation from an object. It has a few key parts:
| Component | Role |
|---|---|
| Optical sensor | Catches infrared radiation from the target surface |
| Lens | Focuses the thermal energy onto the sensor |
| Electronic unit | Converts the radiation signal into a temperature value |
| Digital screen | Displays the finished temperature reading |
Common Industrial and Commercial Uses
Thermal imaging camera calibration has changed how we check temperatures in many areas:
- Food safety checks
- Checking HVAC systems
- Managing manufacturing processes
- Monitoring car parts temperatures
- Assessing home energy use
Accurate non-contact temperature calibration is what makes these readings usable for real decisions, since a device that drifts even a few degrees can lead to a rejected batch of food or a missed equipment fault.
Key Components of an IR Thermometer
Knowing what’s inside these devices helps us understand how they work. Modern infrared thermometers have a detailed optical system, a sensitive thermal sensor, and advanced tech to turn raw infrared data into useful temperature info.
Whether you’re a pro or just a home user, infrared thermometers are a smart, safe way to measure temperature in many places, as long as you keep up with calibration.
Why Regular Calibration is Essential for Accuracy


Keeping your ir thermometer accurate is key. Over time, its precision can change. This affects important measurements in many fields, from restaurant kitchens to manufacturing floors.
Precision in measurement is the hallmark of professional industrial processes, and that precision starts with knowing how to calibrate an infrared thermometer on a schedule that fits how often it’s used. Several things affect how well your thermometer measures temperature:
- Environmental conditions can change how sensors work
- Wear and tear on internal parts can happen
- Dust and dirt on the optical surfaces can be a problem
- Calibration can drift over time
Experts say you should calibrate your infrared thermometer every year. But, if you’re in a critical field, you might need to do it more often. This ensures your thermometer works its best.
Ignoring calibration can lead to real problems:
| Consequence of Skipping Calibration | Where It Shows Up |
|---|---|
| Lower product quality | Food production, cooking, manufacturing |
| Safety risks | Manufacturing, healthcare screening |
| Wasted time and materials | Any operation relying on temperature checks |
| Compliance problems | Regulated industries with documented standards |
The FDA’s guidance on non-contact infrared thermometers and international standards from ISO both stress the need for accurate temperature measurements in clinical and industrial settings. Regular calibration shows you care about quality and excellence.
By regularly calibrating your thermometer, you protect your work, products, and reputation.
Calibration Frequency by Industry
How often you need to calibrate depends heavily on where and how the thermometer is used. A device that sees daily heavy use in a demanding environment needs more frequent checks than one used occasionally in a climate-controlled office.
| Industry or Use Case | Typical Calibration Frequency |
|---|---|
| Food service and food safety | Every 3-6 months, or per local health code |
| Manufacturing and quality control | Every 6-12 months, or per internal SOP |
| Healthcare screening | Per manufacturer instructions, often annually |
| Occasional home use | Annually, or before an important measurement |
How to Calibrate an Infrared Thermometer
Calibrating IR thermometers is key for precise temperature readings in many fields. Experts say accurate high temperature measurement needs the right calibration steps, done in the right order, with the right reference points.

Before you start, gather the right supplies:
- Reference thermometer
- Ice bath container
- Boiling water setup
- Distilled water
- Blackbody calibrator (optional)
Preparing for Calibration
For professional calibration, a controlled environment is vital. It’s best to let your infrared thermometer reach room temperature for 15 minutes first. The lab’s environment is crucial for exact measurements, so avoid drafts, direct sunlight, and nearby heat sources while you work.
- Choose a stable, draft-free indoor space
- Keep the room temperature consistent throughout the process
- Gather your reference materials before you begin
- Note the starting battery level so a low charge doesn’t skew results
Taking a few extra minutes here saves you from re-doing the whole process later.
Ice Bath Calibration Method
The ice water method is a trusted, low-cost way to calibrate at low temperatures. To make a consistent ice bath, do the following:
- Fill a container with crushed ice
- Add distilled water until the ice is fully suspended
- Allow the mixture to stabilize for 5 minutes
- Measure the temperature at 32°F (0°C)
Boiling Water Calibration Technique
The boiling water method is great for checking high temperatures and is a natural next step once you know how to calibrate an infrared thermometer at the low end. To calibrate, follow these steps:
- Boil distilled water at standard atmospheric pressure
- Measure the temperature at 212°F (100°C)
- Compare the reading with a reference thermometer
Calibration accuracy matters here: readings should generally land within about ±1°F for the ice bath test and ±2°F for the boiling water test before you trust the device for critical work.
| Method | Reference Point | Best For |
|---|---|---|
| Ice Bath | 32°F (0°C) | Quick, low-cost checks at low temperatures |
| Boiling Water | 212°F (100°C) | Checking accuracy at higher temperatures |
| Blackbody Calibrator | Adjustable, precise reference temperatures | Laboratory and industrial-grade calibration |
Advanced Calibration with Blackbody Calibrator
Labs and factories often use blackbody calibrators for precise calibration. These tools offer controlled temperatures at points like 50°C and 100°C, and the best units are traceable to national measurement standards such as those maintained by NIST.
Also, most makers suggest calibrating your infrared thermometer every year. This keeps it working well and accurately, and it is worth checking your specific how to calibrate an infrared thermometer instructions from the manufacturer since tolerances vary by model.
Maintaining Accuracy Between Calibrations


Keeping your best infrared thermometer in top shape needs regular care. IR thermometer accuracy depends on proper maintenance between formal calibration sessions. Knowing how to protect and preserve your device ensures accurate temperature measurements, and it means you will need to calibrate less often.
To keep your thermometer working well, follow these key care tips:
- Store the infrared thermometer in a clean, dry place
- Keep it away from extreme temperatures and humidity
- Clean the lens often to avoid dirt buildup
- Be gentle when handling the thermometer to avoid damage
Precision instruments demand precise care. Regular maintenance is crucial: always check the lens for dust or debris before taking measurements. Use a soft, lint-free cloth to clean the optical surface gently. Don’t touch the lens with your fingers, as skin oils can affect temperature readings.
Quick accuracy checks help monitor your IR thermometer’s performance. Compare readings against known temperatures often. Look out for signs of potential calibration needs, like inconsistent measurements or unexpected temperature changes. If you are unsure whether a reading is trustworthy, our guide on how to check accuracy of infrared thermometer readings walks through simple field tests you can run between full calibrations. These quick checks won’t replace a full calibration, but they catch obvious problems early, before a bad reading ends up in a food safety log or a maintenance report.
Keeping Calibration Records
Whether you calibrate at home or send the device out for professional service, keep a simple log. Note the date, the method used, and the results so you can spot drift before it becomes a problem.
- Date of each calibration check
- Method used and reference temperature
- Result and any adjustment made
Environmental factors greatly affect ir thermometer accuracy. Extreme conditions like high humidity, temperature changes, or physical impacts can reduce precision. Always store your device in a controlled environment and handle it carefully when moving it.
Professional calibration is still essential. Even with careful maintenance, regular professional calibrations are needed to ensure your infrared thermometer gives consistent, reliable results. Our guide on how to use an infrared thermometer covers proper technique between calibrations, which matters just as much as the calibration itself.
Conclusion
Choosing the right infrared thermometer is key. Calibration plays a big role in its accuracy. It affects how well it works in many areas, like factories and food safety.
Regular checks keep your thermometer precise. This stops mistakes that could mess up important temperature checks.
Using an infrared thermometer needs careful attention. It’s important in labs, kitchens, and factories. Knowing about emissivity and other factors helps make it more reliable, and it starts with knowing how to calibrate an infrared thermometer correctly and on a regular schedule.
Technology keeps improving these thermometers. By following this guide, you can make sure your thermometer works well. It’s all about a good routine for checking and calibrating it.
As new tech comes out, knowing the latest best practices is crucial. This ensures your temperature readings are always right, whether the device is for work or personal use.
FAQ
Calibration Basics
Q1: Why is calibrating an infrared thermometer important?
A: Calibrating an infrared thermometer is key for accurate temperature readings. Over time, things like environment, wear, and changes can affect its accuracy. Proper calibration helps avoid defects, safety issues, and inefficiencies in many fields, like food safety and HVAC.
Q2: How often should I calibrate my infrared thermometer?
A: Calibration frequency varies based on use and manufacturer advice. It’s best to calibrate yearly or more often in harsh or critical settings. Some industries need more frequent checks due to strict quality standards.
Q3: What are the most common calibration methods for infrared thermometers?
A: Main methods include the ice bath, boiling water, and blackbody calibrator. The ice bath method uses a 32°F (0°C) reference. Boiling water method uses water’s boiling point. The blackbody calibrator is for precise industrial use.
Q4: Can I calibrate an infrared thermometer at home?
A: Yes, basic calibration at home is possible with ice bath or boiling water methods. But, for professional use, a professional service or blackbody calibrator is best. Home methods are good for a basic check but not as precise.
Accuracy and Troubleshooting
Q5: What factors can affect the accuracy of an infrared thermometer?
A: Accuracy can be affected by emissivity, distance, ambient temperature, lens cleanliness, and environment. These factors can lead to errors. Regular calibration and proper handling are crucial.
Q6: How do I know if my infrared thermometer needs calibration?
A: Signs include inconsistent readings, large temperature variations, physical damage, or extreme exposure. Regular checks with known temperatures can help determine when calibration is needed.
Q7: What equipment do I need to calibrate an infrared thermometer?
A: For basic calibration, you need distilled water, ice, and a well-insulated container. For advanced calibration, a blackbody calibrator is recommended. Professional services use specialized equipment for high accuracy.
Q8: Are infrared thermometers accurate?
A: Infrared thermometers are accurate when calibrated and used right. Their accuracy ranges from ±1% to ±2% of the reading. Following guidelines, maintaining the device, and regular calibration are essential for accuracy.


Hi, I’m Mamon, the content creator behind this blog. I share my experience in blogging, WordPress, SEO, and affiliate marketing through honest product reviews, in-depth buying guides, and practical how-to articles. Every piece of content is thoroughly researched and written to help readers make informed decisions.